Wednesday, 8 June 2011

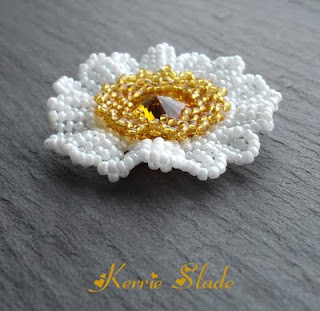
Popper Flowers!

It sort of feels like I blinked and missed the last year, because one minute the Bead Art Fair in Hamburg was a whole year away with plenty of time to prepare for my workshops and now it is only 10 weeks away!  So it's time for me to get busy busy and write the instructions for my classes, draw diagrams, take pictures, bead samples, send out invoices, make kits and so on and so on - have you any idea just how much work goes into preparing to teach a 3 hour beadwork class?  I know I didn't have a clue until I stumbled into this game and became caught up in the whirl of it all.  Not that I'm complaining, I'm really looking forward to my trip to Germany and mingling at the fair and meeting my students and the other teachers who are travelling from far and wide to attend what promises to be a huge and exciting event.


The fair is on the 20th and 21st of August and there are still a few places available on my Popper Flower workshops so if you would like to attend one of my classes, complete this on-line form You can read more about the project on this earlier blog entry.

Popper Flowers.  Pop a flower on.  Pop a flower off.  Change them to suit your mood!


Friday, 27 May 2011

Another new pattern!

Just a quick post today to let you know that I have added another pattern to my website.  The new Spine Flower pattern is now available to purchase from this page of my website.  The actual project is to make a pendant or brooch but this little flower has lots of other potential too.  It works well as a single flower but it would be easy to make several and attach them to each other to make a bracelet or necklace - they would also fit in well with other finished beadwork and I can imagine several of them nestling amongst some lovely beaded foliage for an elaborate collar.


As you can see, you can alter the look of these flowers by changing the colours - from softly feminine pinks to more vivid colours which really makes the spines 'pop', or you might like to leave out the stripes and make your flower in a single colour which changes the look again.  Whatever you decide to do, have fun with your Spine Flowers and don't forget to send me a picture!

Bye for now!

Kerrie ♥

Monday, 16 May 2011

The pattern shop is filling up!

It's been a busy year (and it's about to get busier for the next few months!) but I've managed to find time to add two more patterns to my website.  Both of these have actually been published in magazines already, but  after receiving requests from people asking me to make the patterns available from my website, I have completely rewritten them and added lots of new diagrams and photos.  The first pattern is Daisy Chain (originally published in Bead magazine) and as the pictures below show, you can make your little daisies into a variety of finished pieces - from a complex looking necklace or bracelet to a simpler pendant or pair of earrings.  All of these finished pieces are surprisingly simple to make and full details are included in the tutorial.


The second pattern is for my English Rose necklace (originally published in Perlen Poesie magazine) and is bit more advanced than Daisy Chain, but again, there are lots of diagrams and photos to help you create the finished piece.  The project is to make the necklace shown and the idea is that you make several 'roses' as they are interchangeable, but it would be easy to adapt it to make a bracelet (to save you making several feet of beaded rope!) or you could just make the 'rose' and turn it into a pendant or a brooch.


So the pattern shop is gradually filling up and there are now seven patterns to choose from.  I will be adding one more in the next few weeks and then I really MUST start preparing for my workshop in Hamburg as it is coming around frighteningly fast!  Bye for now!


Monday, 9 May 2011

Old favourites!

I received a lovely surprise in the post today - a copy of 'Favorite Bead Stitches' from Interweave (the publishers of Beadwork magazine).  I knew that I was fortunate enough to have two projects included in this 'collector's edition' but I wasn't sure exactly when it was out and I also wasn't prepared for it being just so GOOD!  There are 41 projects in this 148 page magazine and as I flicked through it I was struck by what a really great collection this is, it's brimming with exciting and innovative projects and although I'm sure I have all the magazines that these projects appeared in, it was wonderful to see them side-by-side - page after page of inspirational designs.


My projects Periwinkle Choker and Frosted Flower Necklace were originally published in Beadwork magazine in 2008 and 2009 and so although it was nice to see them bob to the surface again I wondered whether I might be slightly embarrassed as I have learnt so much since then - but actually, although they are quite simple, I smiled when I saw them and it reminded me that things don't always have to be complicated to make pretty and wearable beadwork.


When I first started sending projects to magazines in 2008 I didn't really have a plan (I'm not sure I actually have one now!) and so it came as another nice surprise when I had a little count up this evening and found that this new magazine actually makes my 30th publication!


Bye for now!
Kerrie ♥

Saturday, 30 April 2011

Wedding Fever!

There seems to be a wonderful happy atmosphere here in the UK at the moment.  After an unusually cold and snowy winter, spring has arrived and now we seem to have been rewarded by endless sunny days of perfect blue sky, trees wearing fresh green leaves, woodlands filled with the scent and colour of bluebells, lanes lined with cowslips, gardens bursting with lilac and laburnum, birds singing their little hearts out and butterflies dancing from flower to flower.  We have two holiday weekends in a row, people are hosting barbecues, neighbours are catching up, children are laughing and 'most' people are smiling - it feels like we have come out of hibernation.  And then there was 'the' wedding yesterday.  We watched The Royal Wedding on a big screen in our local town centre, sat in the market square surrounded by cheering families waving flags and beaming broadly and it felt good.  Talking of weddings ...

(Photo courtesy of Make Jewellery magazine)

... E-Beads recently asked me to design a wedding themed project (using materials from them) to appear in a special wedding issue of Make Jewellery magazine and with perfect timing, this issue of the magazine was published yesterday.


My 'Lace Flowers' use brick, peyote, netting and ladder stitch and (as usual) can be worn in a number of ways.  I used Swarovski cream crystal pearls, tiny seed beads and organza ribbon to create a set for the bride of a choker which can also be worn as a headband, a wrist corsage which doubles up as an anklet (think beach weddings!), a hair comb and a ring - all of these can be made using just the one flower design.


I also made a couple of extra pieces in gold and burgundy to show how easy it is to make jewellery to match the bridesmaids outfits as well as the bride.

Wherever you are in the world and whatever season it is, I hope you enjoyed the spectacle of  'the' wedding and that the romance of the occasion filled you with beady inspiration!

Bye for now!

Monday, 11 April 2011

Spine Flowers!

The date for my next beading workshop is coming round fast and so I have spent the last 2 weeks busily preparing for it; writing instructions, drawing diagrams, taking photos and beading samples.  The class will be held at The Bead Shop (Nottingham) Ltd on May the 26th and is called 'Kerrie Slade's Herringbone Flower', but you know me, I like to have a name for my pieces and so I have called this tutorial 'Spine Flower' because of the stripes in it.


This one is a fun little project that is quite quick to make and the finished flower has lots of potential.  The actual workshop is to make a single flower that can be worn as either a pendant or a brooch, but I am sure that you will find other ways to use your Spine Flower.  It can also look quite different depending on what colours you choose to make it in -  maybe pretty pinks and lilacs or perhaps something similar to my Gothic red and black version?
This project has been set at beginner/intermediate level and ideally you need to be familiar with herringbone stitch, but as usual, I have written comprehensive instructions with plenty of diagrams and photos and of course I will be on hand to help out with any difficulties (if you are thinking of booking this class but are not sure if it will be suitable for you, please contact either myself or the shop staff to check).  It is a 3 hour workshop and costs £40 per person with all materials and refreshments provided.


Hope to meet you on May the 26th!

Wednesday, 23 March 2011

A dose of daisy medicine!

Unusually for me, I've had a couple of quiet weeks when I haven't done much beading, pattern writing or ... anything really.  I felt a little 'under the weather' and it felt like my usual drive had driven off and left me.  Even my normally over-active imagination went into hibernation and when I sat by my window in the evenings looking at the moon, instead of imagining fairies with beaded flowers in their hair skipping around in my moonlight garden ... I just saw the moon.  I think it was probably my body's way of telling me to take a little break though and so I am now more or less back to bouncy and have finally picked up my needle and thread again.  I hardly ever get chance to make the same thing twice and rarely make myself anything these days, so I started off gently by following my own instructions and made two of my Rivoli Daisies.


The first one (shown above) has a Montana blue Swarovski Rivoli for the centre and the beads are a mixture of galvanised Tohos and some delicious little Czech Charlottes I bought some time ago but hadn't got round to using.  Although the pattern shows a complete bracelet of daisies, I just wanted to make myself one flower to hang simply from a silver snake-chain and I must admit I am pretty pleased at the way this has turned out - the blue Rivoli looks like a mesmerizing bottomless pool at the centre of my sparkling daisy and I just want to dive into it ... see, my imagination is fully restored!


I went on to make another Rivoli Daisy as a gift for a friend and this one has a Sapphire Rivoli centre and the petals are made with silver lined crystal and transparent lustered cobalt beads.  It can be worn as either a pendant or a brooch and I think it will go perfectly with jeans and a t-shirt but equally well with something more dressy.  Isn't it great how we can make our own jewellery to match our outfits ... or even vice versa!


I think this is a perfect spring project as the individual daisies don't take too long to make, you don't need many different materials and the great range of Rivoli colours available means that you too can soon bring a touch of beady sunshine into your life.  Imagine the full bracelet (shown below) with each daisy made in a different colour or with all the same coloured petals but each one having a different coloured Rivoli centre!  The Rivoli Daisy (bracelet) tutorial is available to purchase via my website.


See you again soon!