Showing posts with label brooch. Show all posts

Friday 16 October 2015

New Chilli bead!

Hello everyone!

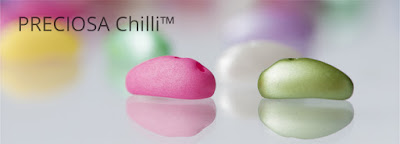
I'm here with news of the new Chilli™ bead which has recently been launched by the PRECIOSA Traditional Czech Beads brand. Once again I was fortunate enough to be involved in creating some promotional pieces using the new beads and so I spent a couple of happy weeks turning them this way and that and having a whole lot of fun with them. The Chilli measures 4 x 11 mm and is a narrow elongated bead with a flat edge and two holes which you can see in the picture below.


I've worked with a lot of shaped beads in the last few years and one of the things I particularly liked about the Chilli bead is that it works well with either the convex or concave side uppermost, or even on its side. Modern beads come in such a wonderful range of colours and finishes that it's nice to be able to admire them from every angle and so for the first piece I made I captured an upturned Chilli between pairs of Chilli beads on their side and then added a cluster of them in the centre with the curved side on top. I used a base of black Ultrasuede and a liberal sprinkling of chrome seed beads to complement the lovely mottled black and silver finish of colour number 23980/15481 and then turned it into a brooch.


I liked the way this piece turned out and so I made another very similar piece using Chilli beads in colour number 23980/86800 which has a really nice speckled finish. Again I used black Ultrasuede as a backing, but this time with slightly smaller black seed beads and a burst of shiny silver seed beads in the centre for a touch of drama. Rather than a brooch I turned this one into a pendant by creating a hanging loop of seed beads and threading a length of black satin ribbon through it.


For the next piece I used silver Chilli beads (colour number 00030/27000) with shiny silver seed beads and black Twin beads to make some star-shaped components. Because the Chilli beads have two holes they mix perfectly with the other two-holed beads and so Chillies and Twins are a match made in heaven. I attached the individual components together using jump rings and some more Twin beads as connectors and then whipped up a pair of matching earrings to complete the set.


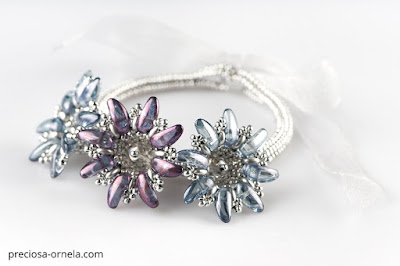
As much as I love the classic black and silver combination, I wanted to introduce a little more colour and femininity into my final design and so I decided to make a romantic flower bracelet. For this one I used some beautiful transparent purple Chilli beads (00030/15781) and a lovely transparent pale blue (00030/14464) and mixed them with silver seed beads. I popped an 8 mm crystal AB fire polished bead into the centre of each one and attached the completed flowers to a simple herringbone rope.


There is a Flickr album full of stunning photos of Chilli bead pieces made by other designers which you can scroll through for inspiration and you can also see the full range of colours and finishes available in this album. Preciosa has four free Chilli bead projects available to download from their website and some stores around the world already have the new beads in stock too so you can get started right away. Don't forget that Preciosa is always happy to see your designs using their beads, so be sure to show them your Chilli bead creations via their Facebook page.

See you next time!

Kerrie

Saturday 22 February 2014

Prima product of the month - January/February!

Hello everyone!

It's the Prima Bead product of the month time again and this time the members of the blogging team were asked to become 'guest designers' and imagine that we were writing a project for their catalogue. Each member of the team was sent a couple of toggle clasps, some bicone mirror beads, a pack of crimp beads and a reel of elastic but we were also told that we could incorporate other Prima Bead products that we have previously been sent. As soon as I saw that my bicone mirror beads were red and black I thought of my visits to Spain and words like 'flamenco' and 'pasodoble' started to echo in my mind. Then, when I saw that one of the toggle clasps was a hammered silver circle with a round hole in it - a plan began to take shape. Rather than use the toggle as a clasp I only used half of it and turned it into a brooch/pin which I have called Ojo Del Toro, which I am hoping means eye of the bull. The finished piece represents the eye of the bull in a bullfight with the red and black lances piercing the skin, but before anyone starts writing to me, please note that this is a symbolic piece and does not in any way mean that I support bullfighting!


I will be submitting the PDF of my instructions to Prima Bead, but to make this pin I took the silver hammered toggle and glued a brooch pin to the back of the toggle on the widest part.


Next I took some head pins from a findings starter pack and threaded the bicones onto them before turning a loop at the top. Then using the jump rings from the starter pack I suspended the bicone 'lances' from the 'eye' so that they dangle and dance at the base of the brooch.


That's it for this time but I'll be back soon with more beady news. In the meantime, leave a comment and let me know what you think of Ojo Del Toro.

Bye for now!

Kerrie


Friday 27 May 2011

Another new pattern!

Just a quick post today to let you know that I have added another pattern to my website.  The new Spine Flower pattern is now available to purchase from this page of my website.  The actual project is to make a pendant or brooch but this little flower has lots of other potential too.  It works well as a single flower but it would be easy to make several and attach them to each other to make a bracelet or necklace - they would also fit in well with other finished beadwork and I can imagine several of them nestling amongst some lovely beaded foliage for an elaborate collar.


As you can see, you can alter the look of these flowers by changing the colours - from softly feminine pinks to more vivid colours which really makes the spines 'pop', or you might like to leave out the stripes and make your flower in a single colour which changes the look again.  Whatever you decide to do, have fun with your Spine Flowers and don't forget to send me a picture!

Bye for now!

Kerrie ♥

Thursday 9 December 2010

Popper Flowers Workshop in Hamburg!

Well this has been a long time in the planning stages, but I am finally able to tell you that earlier this year, I had the honour of being invited to teach at the first Bead Art Fair in Hamburg (Germany) in 2011 - and of course I said 'Yes please!' to that fantastic offer.  Since then, all of the teachers have been busy preparing their workshop projects and the classes have now been announced and are available for you to book.  The fair is on the 20th and 21st of August 2011 and promises to be a huge and exciting event with lots of exhibitors and classes.  Workshop places are limited (I am offering one class on Saturday and one on Sunday and each has only 10 places available) and I have heard that they are already filling up, so if you would like to book a place, please hurry!


My workshop project is called Popper Flowers!  In the class I will show you how to use a combination of stitches to create two different coloured flowers with a single base of green leaves.  The flowers are interchangeable and so you can pop a flower on, pop a flower off and change them to suit your mood.  The project is to make the Popper Flower into a pendant that you can then hang from a necklace of your choice, but you could just as easily turn your Popper Flower into a brooch, a bracelet, a ring ... anything you fancy really!


The price of the workshop will include the materials (excluding Fireline which you will need to bring with you) and I am offering 3 colour choices.  Kit A has a pink and a purple flower, Kit B has a yellow and a blue flower and Kit C has a black and a white flower - each kit has a different coloured leaf base.  This is an advanced project and will not be finished in class, but we will cover all the tricky bits in class and I will also be providing comprehensive instructions for you to take home to complete your Popper Flowers.  The class will be in English but there will be a German translator on hand.


I think this is going to be a really fun class and I would love to meet you, but don't forget to take a look at all of the other wonderful workshops being offered by a host of great international teachers.  The fair is organised by the German magazine Perlen Poesie and full details can be found on their website be sure to check out all the links under the Messe/Show 2011 tab.


You can see all the available workshops here and the booking form for all workshops is here.  See you at the Bead Art Fair!

Thursday 30 July 2009

Sunshine on a rainy day ...


Following on from my 'Hello Yellow!' blog entry, I've finally made myself a piece of yellow jewellery to wear. I wanted to make something really bright and cheerful to make up for the wet weather we are having here in central England right now - so what better than a sunflower?


Jean Power's new blog 'Colour Challenge' really got me thinking about why I haven't used many yellow beads in my work so far and so I bit the bullet and chose the brightest of yellow cylinder beads to experiment with. I also used a lovely shade of shiny brown beads for the centre and bright green beads for the stem and leaves. This is quite a departure from my early work which was often in muted shades of pinks and purples with dark greens, but hey - if nature can do it, why can't I? I'm really pleased with the way this has turned out and although it's only three inches high, I managed to squeeze in forty-eight little petals and broke three needles in the process! I've made two of these so far, one is for sale in my Etsy shop and the other one is for me - it makes me smile every time I look at it and I'm hoping it will spread a little happiness when I wear it out and about.