Showing posts with label seed beads. Show all posts

Friday 16 October 2015

New Chilli bead!

Hello everyone!

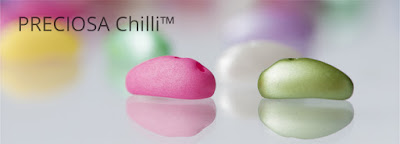
I'm here with news of the new Chilli™ bead which has recently been launched by the PRECIOSA Traditional Czech Beads brand. Once again I was fortunate enough to be involved in creating some promotional pieces using the new beads and so I spent a couple of happy weeks turning them this way and that and having a whole lot of fun with them. The Chilli measures 4 x 11 mm and is a narrow elongated bead with a flat edge and two holes which you can see in the picture below.


I've worked with a lot of shaped beads in the last few years and one of the things I particularly liked about the Chilli bead is that it works well with either the convex or concave side uppermost, or even on its side. Modern beads come in such a wonderful range of colours and finishes that it's nice to be able to admire them from every angle and so for the first piece I made I captured an upturned Chilli between pairs of Chilli beads on their side and then added a cluster of them in the centre with the curved side on top. I used a base of black Ultrasuede and a liberal sprinkling of chrome seed beads to complement the lovely mottled black and silver finish of colour number 23980/15481 and then turned it into a brooch.


I liked the way this piece turned out and so I made another very similar piece using Chilli beads in colour number 23980/86800 which has a really nice speckled finish. Again I used black Ultrasuede as a backing, but this time with slightly smaller black seed beads and a burst of shiny silver seed beads in the centre for a touch of drama. Rather than a brooch I turned this one into a pendant by creating a hanging loop of seed beads and threading a length of black satin ribbon through it.


For the next piece I used silver Chilli beads (colour number 00030/27000) with shiny silver seed beads and black Twin beads to make some star-shaped components. Because the Chilli beads have two holes they mix perfectly with the other two-holed beads and so Chillies and Twins are a match made in heaven. I attached the individual components together using jump rings and some more Twin beads as connectors and then whipped up a pair of matching earrings to complete the set.


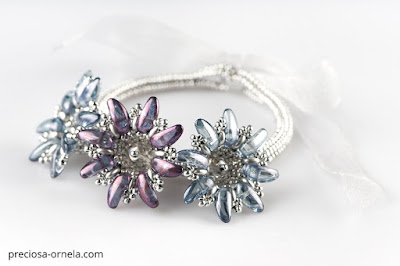
As much as I love the classic black and silver combination, I wanted to introduce a little more colour and femininity into my final design and so I decided to make a romantic flower bracelet. For this one I used some beautiful transparent purple Chilli beads (00030/15781) and a lovely transparent pale blue (00030/14464) and mixed them with silver seed beads. I popped an 8 mm crystal AB fire polished bead into the centre of each one and attached the completed flowers to a simple herringbone rope.


There is a Flickr album full of stunning photos of Chilli bead pieces made by other designers which you can scroll through for inspiration and you can also see the full range of colours and finishes available in this album. Preciosa has four free Chilli bead projects available to download from their website and some stores around the world already have the new beads in stock too so you can get started right away. Don't forget that Preciosa is always happy to see your designs using their beads, so be sure to show them your Chilli bead creations via their Facebook page.

See you next time!

Kerrie

Friday 2 October 2015

Safari Rings!

Hello everyone!

Although I love the freedom of being a one woman freelancer, I often find it frustrating that there is nobody to share the workload and help out with the boring stuff (like doing accounts, taking photos and updating websites) leaving me free to bead all day, every day. This means I don't get as much time as I'd like to work with all the wonderful beads available out there and I have to be a bit careful about what work I take on, however I am still happy to be a design team member for Many Hands Marketplace - Kazuri West as helping to promote the work of the Samunnat and Kazuri ladies is very important to me. So I am glad to report that Bead and Button magazine has recently published my 'Safari Ring' project in the October 2015 issue of the magazine. And look - and there's even a tiny thumbnail picture of the project on the cover!


This is a very simple project designed purely to show off those fabulous animal print Kazuri buttons  - just one netted ring band (either narrow or wide) made with Preciosa Ornela seed beads and a variety of interchangeable buttons that you can snap on and off to suit your outfit or your mood. Perhaps one day you feel a little bit cheeky cheetah, another day could be an elephant kind of day (and we all have those!) or maybe it's a roaring lion type of day - make a ring in a couple of hours and go on your own personal safari!


I was pleased to read that in her editor's note, the editor of Bead and Button wrote "For a piece that is pure fun, try Kerrie Slade's adorable "Snappy safari ring", consisting of an easy netted ring with interchangeable snap-on animal print buttons. Love it!" as that is exactly what this project is all about. It's not technically challenging, it won't win any prizes and it doesn't take a week to make but hopefully it will inspire you to take a look at the lovely hand crafted Kazuri animal print buttons and perhaps purchase a few to help to support the disadvantaged ladies who make them.

See you next time!

Kerrie


Thursday 5 March 2015

Ripples!

Hello everyone!

A few days ago Preciosa Ornela released their brand new Ripple™ bead onto the market and I'm happy to say that I had the good fortune to be involved in making some sample pieces using this interesting new bead, so let me tell you a bit about them. The Ripple is a circular pressed glass bead with a 12 mm diameter and it has a wavy curve to it - hence the name. It comes in a wide range of the most beautiful vacuum coated colours in both shiny and matte finishes and I have to say that although not necessarily ideal for the usual beadweaving stitches, I fell in love with this new bead. Because these beads have a much larger surface than most beads I usually work with, you really get the full impact of the colour and what with the pleasant S-shaped curve of the side view, it's hard not to be drawn to them. Like many larger pressed beads, they really want to take centre stage, but they do mix well with a few seed beads - here is what I did with my Ripple beads:


It's difficult for me to stay away from a seed bead, and so for my 'Ripples on the Surface' bracelet I firstly made a narrow strip of herringbone using bright silver seed beads and then I decorated it with glittering Ripples in glorious California Green. For the finishing touch and to bring out the other colours in the Ripples, I tied it with a length of pink ribbon.


For the next experiment I chose California Silver and California Graphite Ripples (in both shiny and matte) and using more silver seed beads I made lots and lots of little stems and loops for them. Then I threaded them all on to a sterling silver screw end bangle so that they were very tightly packed. This encouraged the Ripples to bunch up and show off their lovely surfaces which you can see in 'Clustered Ripples' shown above.


Still liking the options that little seed bead loops gave me, I went on to make more using California Silver Ripples and black seed beads. These Ripples are silver on one side and gold on the other and so I made sure I threaded them all the same way round to create 'Reversible Ripples' which (as the name suggests) can be worn with the silver facing the front or the gold.


I really like the side view of the Ripple beads and so I wanted to find a way to display that lovely curve as well as the finish on the flat side. After a bit of experimentation I found a way to stabilise a circle of Ripples and then nestled them in to a bed of seed beads to make a sparkly little crown shaped brooch. I enjoyed making these so much that I actually made a set of three 'Ripple Crown Pins' using California Blue, California Graphite and California Night Ripple beads.


As time was running out but there were still Ripples to use and colours to show, I finished off with a simple strung bracelet which I've named 'Ripples and Pearls'. I chose the matte version of the California Green Ripple bead which has a lovely pink and gold finish to it and I mixed them with some creamy 4 mm glass pearls to make a slinky 3-strand bracelet using a fabulous silver clasp from A Grain Of Sand.

So there you have the results of my Ripple experiments, but there are many more ways to use these delightful new beads and if you take a look at Preciosa's Flickr album you can see some really wonderful work by the other designers.

See you next time!

Kerrie

Monday 1 December 2014

Hexagonal Lace Cuff!

Hello everyone!

I'm happy to tell you that it's free pattern time again! Make lots of six-sided components using a mixture of Preciosa Ornela seed beads, Farfalle™ and Twin™ beads and connect them all together to create this dramatic cuff style bracelet just in time for the party season. You can download the pattern here.


You might not recognise it, but this piece actually started out as Peas and Carrots bracelet which I made in August of last year. Bead and Button magazine wanted something a little more 'subtle' though and so I made another one using a combination of black, silver and half jet and half labrador beads to add a touch of elegance.


This is quite a wide statement piece which needs a secure closure to keep the two halves in place and to prevent the outer rows from furling. On the original bracelet I used a piece of ribbon zig-zagged through two loops to keep everything firmly in place, but for the new colourway I've added two beautiful jet Swarovski box clasps from A Grain Of Sand to create a reliable fastening with a nice streamlined finish.


Whether you choose neon brights or classic black and silver (or something entirely different!) I hope you have fun with the pattern. And feel free to share pictures of your finished piece with me, Preciosa or Bead & Button as we would all love to see your Hexagonal Lace Cuff.

See you next time!

Kerrie

Wednesday 12 November 2014

Kazuri Kritters!

Hello everyone!

Back in August I posted the news that I have become a design team member for Many Hands Marketplace - Kazuri West and I showed you my Samunnat Flowers which use the gorgeous 'Bindu' beads made by the inspirational ladies of Nepal. I mentioned that I also had a small collection of African Kazuri beads and I was hoping to show some pieces made with these before now (but you know how life can sometimes change our plans) but finally, here are my Kazuri Kritters! I always like a touch of whimsy in my life and so as soon as I spotted these little handmade animal shaped buttons I knew they would be a perfect fit for me. I've created a set of three brooches and I've used lots and lots of seed beads from Preciosa Ornela to give each animal their own special shady tree.


Each piece is only 3 inches (8 cm) high but they took many hours to make as the 'leaves' are created with layer upon layer of small seed beads. And so as I was in full whimsical mode, I wrote each animal a little story as I beaded. Read on ...

Cheetah Tree


It's a searingly hot afternoon and Cheetah sits in the shade of his favourite tree. His belly is full from an earlier feast but still he hides in the long grass observing a herd of wildebeest - it's cheetah nature. He frowns as a lazy fly buzzes around him, flicks the tip of his handsome tail and yawns. Cheetah can see far, far into the shimmering distance and yet he doesn't notice a pair of Seeall birds nestled quietly in the foliage right above him. The birds watch Cheetah watching the wildebeest watching a dark shape in the shadow of the well known Cheetah Tree.

Zebra Tree


It's a bright African morning, the sky is cornflower blue with dazzling white clouds billowing on the horizon. Zebra stands under a Scarlet Blossom Tree contemplatively munching a fragrant red flower. His beautiful reverie is broken suddenly by an egret swooping down nearby. Zebra snorts, stamps a hoof and testily swishes his tail about his stripey muscular buttocks. And then he remembers the taste and the smell of those delicious rare ruby blooms that lay in abundance on the ground around him and he licks his lips in contented anticipation. All is right in Zebra's world again.

Giraffe Tree


It's just before sunset. A lone Pearlfruit Tree stands drenched in the heavy honey-dripping light making the fruit gleam like stars in the night sky. Giraffe stands under the tree with the weeping branches swaying and rustling around her slender elegant neck. She knows from experience that the enticing looking fruit are bitter to taste and will only dry her already parched and dusty throat even further - the real prize is the young fresh leaf buds that sprout high in the centre of the tree. She stretches upwards, effortlessly strips a twig and slowly closes her long dark lashes as she tastes the juicy sweetness.

I hope you enjoyed looking at my Kazuri Kritters and reading their stories and I hope you see what I see. Don't forget you can help support the work of Kazuri West by purchasing the beads, buttons and finished jewellery and if you would like to create your own mini safari, the animal buttons are available from this page.

See you next time!

Kerrie


Friday 22 August 2014

The Wedding Collection!

Hello everyone!

Back in June/July it might have seemed as though I had gone very quiet and you may have thought that I was neglecting my beads in favour of the summer sunshine - but actually I was secretly working on a beaded wedding collection for Preciosa Ornela. It's been a long time since I've been to a wedding and when I got married (20 years ago!) I didn't even bead and so I had to really dig deep when I was wondering about what to make. Rather than making random items, I knew I wanted to make a cohesive colour themed collection that would fit an imaginary wedding but I only had a limited colour palette to work with. I decided to go with traditional white for the bride and pink for the flowergirl and then mixed pink and white for the remaining items - apart from a dash of shiny black for the groom. The first person in the wedding party to be kitted out was my imaginary groom who received a pair of black and white floral cufflinks - a touch of beadwork for him, but not too much.


Next I turned my attention to the bride and as I had recently been working with Preciosa's Pip beads, I decided to use some lovely alabaster Pip beads to make her a matching Kumihimo necklace and bracelet set.


I had a few white Pip beads left over so I decided to make the bride a  pair of matching earrings and a set of three hair grips. I also made her a decorated hair comb by attaching a single Pip flower and adding some tiny seed bead leaves and a couple of sparkling crystal AB fire polished beads for a touch of understated sparkle.


I wanted the bride to glide elegantly down the aisle without being too weighed down by beadwork so I left her collection at that, hoping that the soft sheen of the white beads and the odd glimpse of silver would add to her natural glowing beauty without taking over. Next I pictured a pretty little flowergirl of perhaps 3 or 4 years old and first I made her a tiny wrist corsage with a simple pale pink Pip flower threaded onto sheer pink organza ribbon. She also has a matching hair band with three pale pink flowers which sit on top of her hair with a lovely pink bow tied at the back.


Of course being a flowergirl, our little girl needed some flowers to carry and so I created a small posy for her. In order to bring the pink and white theme together I used a mixture of pink and white seed beads for the petals, added some crystal AB fire polished beads for the stamens and some bright shiny green metallic stems. The posy is tied with the same sheer pink organza ribbon that I used for her bracelet and hair band. Can you imagine how long this single item took to make?


Next I thought about the wedding guests and I remembered that they would need a buttonhole. So I made a larger version of the flowergirl's pink and white speckled flower and added a bow and a pin to make it easy for them to attach it to their outfit.


After that I turned my attention to making items to decorate the tables for the wedding feast and of course I wanted it all to be pink and white to be in keeping with the wedding jewellery. First I decorated a plain white candle with some pale pink flowers.


Then I thought the guests might like something to take home to remind them of the beautiful pink and white wedding and so I decorated some simple white bags with pink and white seed beads, added some pale pink flowers, filled it with heart-shaped chocolates wrapped in silver foil and tied it with pink ribbon. Those chocolates are delicious by the way!


The little flowers that I had made to decorate the candle and favour bag were quick and easy to work up and so I made a few more of them, along with some tiny seed bead hearts to use as table scatters to decorate the top table.


And to round off the collection I decided to create a place card holder so that everyone would know where to sit. I made a freestanding flower with the same randomly speckled pink and white flowers that I had used for the flowergirl's posy and the guests' buttonholes and added some leaves, a long crystal stamen and a pink bow and I invited a very special guest.


So there you have it - the results of four weeks of quiet beading! Although some of these pieces are very tricky and time consuming to make, I enjoyed every minute of it and loved the opportunity to let my imagination run wild - thank you Preciosa!


See you next time!

Kerrie

Wednesday 19 February 2014

Pellet Stars!

Hello everyone!

Just a quick post today to let you know that the instructions for another piece I made using Preciosa Ornela's Pellet™ beads have been published in issue 8 of Digital Beading Magazine. This time it is the quick and easy Pellet Stars bracelet and earrings set. I mixed opaque blue Pellets with silver seed beads to make a summery looking set but you can create a very different look using other colour combinations - I haven't taken any photos but I made myself a pair of earrings using olive Pellets mixed with gold seed beads and they are my new favourite ear decoration!


This bracelet also features in a full page Preciosa advert in the current issue of Bead Style magazine and Digital Beading Magazine. If you are looking for Pellet beads you can find them at Kandra's Beads and Robin's Beads as well as other stockists of Preciosa beads.


There are two more Pellet projects waiting in the wings; one in an upcoming issue of Bead & Button magazine and another which will be a free project with Preciosa. So, if you are looking for ways to use this fun new bead shape, be sure to complete the 'Follow by Email' box at the top of my blog so that you don't miss any news.

See you next time!

Kerrie
 

Friday 1 November 2013

Prima product of the month - October!

Hello everyone!

Yes it's time for my fourth Prima product of the month post. You may remember that for our first assignment everyone in the group was asked to create something using items from the Stainless Steel Elegance collection, the second challenge involved Prima's Kumihimo range and last month we were all sent 'Tis the Season products. This month was a bit different as all the team members were sent a fun questionnaire to enable the folks at Prima to hand pick our October products and tailor them more towards our likes and strengths. It will come as no surprise  to you to learn that I may have mentioned 'beads' once or twice in my answers and so when my box arrived I was pleased to see that it contained lots of seed beads together with a few sweet little charms and some unusual black findings. Although I thoroughly enjoyed the first three challenges, I had to brush up on some almost forgotten techniques and learn some new ones in order to keep up, so it was nice just to be able to bead this time. Apart from the beautiful colours of seed beads, the first thing that caught my eye was a little seahorse charm and so I mixed it with some silver-lined teal seed beads from Prima and added a few pearls from my stash and a little piece of cream organza ribbon to create 'The Mermaid's Assistant'. I intended this to be a whimsical little item that you could hang in a window, or perhaps on the rear-view mirror of a car, as the seaweed drapes beautifully around the seahorse's head and the little basket of pearls swings freely from the tail, but you could always add a chain and wear it as a necklace.


Next I pulled a hank of pre-strung seed beads out of the box. These were already nicely arranged in sections of two different coloured pinks with purple and they would look great simply strung as they were, but instead I took my scissors to the strands and separated the beads into piles of the same colour. Then I brick stitched three little hearts and added a connector to the front of each one to create Love, Faith and Hope Pins.


By then the end of the month deadline was approaching but I wanted to make sure that I used those black findings in something. So I quickly whipped up a couple of little herringbone flowers with the black seed beads Prima sent me, added a red crystal to the tip of each one as a contrast and hung them from black jump rings and earwires. I just had enough time left to make a matching bracelet by attaching a smaller flower to a length of black chain. I then added a clasp and lots of decorative dangles made from the head pins, jump rings and the remaining crystals and seed beads to make Fiery Nights bracelet and earrings set.


So that's it for another month! I have no idea what the 'product of the month' will be for November but Prima Bead has a huge range of products so let's wait and see!

See you next time!

Kerrie