Wednesday, 23 March 2011

A dose of daisy medicine!

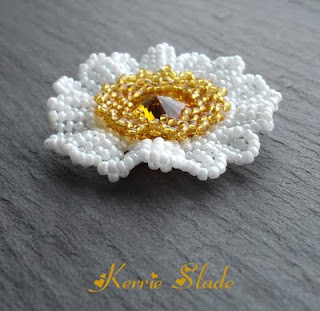
Unusually for me, I've had a couple of quiet weeks when I haven't done much beading, pattern writing or ... anything really.  I felt a little 'under the weather' and it felt like my usual drive had driven off and left me.  Even my normally over-active imagination went into hibernation and when I sat by my window in the evenings looking at the moon, instead of imagining fairies with beaded flowers in their hair skipping around in my moonlight garden ... I just saw the moon.  I think it was probably my body's way of telling me to take a little break though and so I am now more or less back to bouncy and have finally picked up my needle and thread again.  I hardly ever get chance to make the same thing twice and rarely make myself anything these days, so I started off gently by following my own instructions and made two of my Rivoli Daisies.


The first one (shown above) has a Montana blue Swarovski Rivoli for the centre and the beads are a mixture of galvanised Tohos and some delicious little Czech Charlottes I bought some time ago but hadn't got round to using.  Although the pattern shows a complete bracelet of daisies, I just wanted to make myself one flower to hang simply from a silver snake-chain and I must admit I am pretty pleased at the way this has turned out - the blue Rivoli looks like a mesmerizing bottomless pool at the centre of my sparkling daisy and I just want to dive into it ... see, my imagination is fully restored!


I went on to make another Rivoli Daisy as a gift for a friend and this one has a Sapphire Rivoli centre and the petals are made with silver lined crystal and transparent lustered cobalt beads.  It can be worn as either a pendant or a brooch and I think it will go perfectly with jeans and a t-shirt but equally well with something more dressy.  Isn't it great how we can make our own jewellery to match our outfits ... or even vice versa!


I think this is a perfect spring project as the individual daisies don't take too long to make, you don't need many different materials and the great range of Rivoli colours available means that you too can soon bring a touch of beady sunshine into your life.  Imagine the full bracelet (shown below) with each daisy made in a different colour or with all the same coloured petals but each one having a different coloured Rivoli centre!  The Rivoli Daisy (bracelet) tutorial is available to purchase via my website.


See you again soon!

Wednesday, 9 March 2011

English Rose

Several months ago, I was asked to create a necklace project for the beautiful new German beadwork magazine Perlen Poesie -  'English Rose' is the result of my experiments and the instructions can be seen on page 58 of the latest issue of the magazine.  Once again, this is a necklace that can be worn in several ways as the 'rose' is removable and so you can change the colour of the flower, wear it high at the neck or lower down, knot or plait the stems or let them hang freely and cluster gently beneath the rose.  This is quite a difficult piece to photograph as it is very long, but the following picture shows the soft drape of the stems and leaves as they are held in place by the flower.


The next picture shows the 'Silver Shadow' version of the necklace and also highlights the silver spines on the leaves.


The following picture shows the 'Burgundy Bloom' version of the necklace and the strong red provides a real contrast to the pale pink version - change them to suit your mood or your outfit!


Another view of the true 'English Rose' version of the necklace, showing the rose worn high at the neck with the stems gently braided.


And finally (now that I have learnt how to make them!) a collage of the 'English Rose Collection'.


I hope that you like the new necklace and that you will enjoy making your own - as always, feel free to send me a picture of your own version and I will gladly add it to the 'Readers' Gallery' page on my website.  The Bead Shop (Nottingham) Ltd stock this magazine or you can subscribe directly via this page of the magazine's website.

Monday, 14 February 2011

Another Creative Challenge!

Do you remember last year when Beads Direct gave me a beady challenge?  I really enjoyed that experience of being stretched creatively when asked to design something different, and yet  being bound by certain constraints (such as a particular size and colour of beads to work with) and so I was very happy when a couple of weeks ago E-Beads threw down the gauntlet and challenged me to make their logo using beads!


I knew straight away that the basic 'dandelion clock' would be fairly easy to create in beadwork and I set about using a combination of Swarovski crystal pearls and seed beads to get the look I wanted.


It still took me several attempts (and many hours!) to get the bead count right so that my piece had exactly the same number of large beads in it as the logo and to ensure that it laid flat without too many ruffles.  As I worked, I kept wondering how on earth I was going to create the 'flyaway petals' included in the logo . At first I tried turning my dandelion into a brooch and attached the petals with wirework, but I didn't really like the look of it.  Next I tried creating a flat piece of beadwork with the beaded dandelion and petals attached to it, but I couldn't really see how it could be worn as it would have been quite large.  Then I noticed an image of a little bag with the logo on, on E-Bead's website, and that's when I came up with the idea of embellishing a bag with the logo and so I beaded the nine separate petals and attached them to the bag and then added a narrow beaded handle and some surface decoration.


As I had already created the dandelion and stem, I thought it would give the finished piece an added dimension if I also made that part of the logo wearable and so I attached a brooch/bail to the back of the dandelion so that it can be pinned to the bag, or removed and worn as either a necklace or a brooch.


Below is a picture of the original logo that I was working from and both myself and E-Beads would love to hear what you think of my version of their logo.  Leave a comment on my blog, or email E-Beads via their website or become a 'fan' of their Facebook page and leave a comment there.


Let me know what you think and what your solution to including those tricky 'flyaway petals' would have been!

Bye for now!
Kerrie ♥

Wednesday, 26 January 2011

Teaching Timetable ...

There's not much to report at the moment as I have been busy writing instructions, drawing diagrams and taking photos for my new workshops.  I have managed to sneak in the odd hour or two for putting a new idea into beads for my next tutorial (after all there has got to be some light relief from all that computer work) but it will probably be some weeks before the new design is finished or added to my website - it's going to be a little bit different from my usual style with lots of citrus colours and an asymmetric twist, so watch this space!  In the meantime, I suddenly realised that I haven't actually posted details of my new classes, and as there are still some places left I thought I should tell you about them as the first class is next week!


I will be teaching four 3 hour workshops at The Bead Shop (Nottingham) Ltd.  The first one on February the 3rd is 'Spring Daisies' and I will also be teaching this again on May the 14th.  The other workshop is 'Herringbone Flower' and I will be teaching this on March the 12th and May the 26th.  The city centre venue is lovely and spacious and bright, with a beautiful bead shop stuffed full of sparkly goodies on the ground floor, all materials are included, workshop students receive a 10% discount voucher to be used in the shop after class, there are lots of tasty fairtrade refreshments on offer and the atmosphere is fun and friendly - what more could you wish for?  Full details and booking information can be found here.

Friday, 7 January 2011

Resolutions!

Happy New Year everyone!

Did you make any New Year's resolutions?  I made the usual ones of course; eat more healthily, take more exercise and all the other ones that are usually broken by the second week in January, but I also resolved to keep moving forward with my beading.  I have exciting plans for an exhibition in 2012 and my butterfly mind keeps flitting to thoughts of that, but first I think that 2011 is going to be all about teaching.  I have 6 workshops lined up in the UK and Germany and I'm also planning on making more patterns available to purchase via my website, but all of that means a lot of detailed planning, writing instructions and drawing diagrams instead of designing new beadwork.  I do have a head full of new ideas to try out though, so watch this space!  In the meantime, I thought I'd remind you that one of my resolutions for 2010 was to start selling patterns directly from  my website and I now have 5 available - details below.  These are in addition to the 26 patterns that I have had published in magazines since 2008 and you can see details of all those on this page of my website.  Most of them are still available from the publishers as pdf's or back issues, so if you see one you like but can't find, drop me a line via the contact form on my website and I'll try and track it down for you.  All of the patterns below are available from this page of my website.


Bye for now!

Thursday, 9 December 2010

Popper Flowers Workshop in Hamburg!

Well this has been a long time in the planning stages, but I am finally able to tell you that earlier this year, I had the honour of being invited to teach at the first Bead Art Fair in Hamburg (Germany) in 2011 - and of course I said 'Yes please!' to that fantastic offer.  Since then, all of the teachers have been busy preparing their workshop projects and the classes have now been announced and are available for you to book.  The fair is on the 20th and 21st of August 2011 and promises to be a huge and exciting event with lots of exhibitors and classes.  Workshop places are limited (I am offering one class on Saturday and one on Sunday and each has only 10 places available) and I have heard that they are already filling up, so if you would like to book a place, please hurry!


My workshop project is called Popper Flowers!  In the class I will show you how to use a combination of stitches to create two different coloured flowers with a single base of green leaves.  The flowers are interchangeable and so you can pop a flower on, pop a flower off and change them to suit your mood.  The project is to make the Popper Flower into a pendant that you can then hang from a necklace of your choice, but you could just as easily turn your Popper Flower into a brooch, a bracelet, a ring ... anything you fancy really!


The price of the workshop will include the materials (excluding Fireline which you will need to bring with you) and I am offering 3 colour choices.  Kit A has a pink and a purple flower, Kit B has a yellow and a blue flower and Kit C has a black and a white flower - each kit has a different coloured leaf base.  This is an advanced project and will not be finished in class, but we will cover all the tricky bits in class and I will also be providing comprehensive instructions for you to take home to complete your Popper Flowers.  The class will be in English but there will be a German translator on hand.


I think this is going to be a really fun class and I would love to meet you, but don't forget to take a look at all of the other wonderful workshops being offered by a host of great international teachers.  The fair is organised by the German magazine Perlen Poesie and full details can be found on their website be sure to check out all the links under the Messe/Show 2011 tab.


You can see all the available workshops here and the booking form for all workshops is here.  See you at the Bead Art Fair!

Monday, 29 November 2010

It's official ...

... I teach beadwork!  This has been a long time coming, but I finally have my first workshop under my belt with several more in the pipeline.  My first class was held at The Bead Shop (Nottingham) Ltd. and it will definitely be a day to remember as we woke up on the morning of the workshop to be greeted by this scene;


We didn't feel that it was safe to drive, but fortunately the buses were still running and so I made it to the workshop on time, and so did the staff at the bead shop and my four lovely eager students.  Although it was a full day workshop, we knew that it wouldn't be possible to complete the Double Daisy project in class, but everyone got stuck in, choosing their colours and juggling peyote stitch, ladder stitch and brick stitch until little petals began to appear.  Keeping my first workshop small with only four students, meant that I could spend lots of time sitting with each student individually, checking that they were on track and also chatting about their favourite bead stitches and admiring some of the beautiful beadwork that they had brought with them.  As well as a lovely spacious (and warm!) workshop area, the bead shop also provided plenty of tea and biscuits which all made for a really enjoyable day before we all had to wrap up and head off home in the snow!


This project was designed exclusively for The Bead Shop (Nottingham) Ltd. but now that the workshop has finished, you can buy the comprehensive 18 page tutorial via my website and make your own Double Daisy!  The instructions cover how to make the finished daisy and include some ideas on ways to use it; you might like to turn yours into a pin/brooch, create a loop of beads at the back to turn it into a pendant or sew it onto finished beadwork or ribbon (as in the picture below) to make a glamorous choker or wrist corsage!


Whatever you decide, have fun and don't forget to send me a picture!  The pdf of the instructions is available for purchase here and will be delivered by email.